“You cannot change what you don’t manage; you cannot manage what you don’t track.” – Valentino Crawford
If you want to improve the ROI of your email marketing, you’ve to track, measure, and refine your email campaigns.
But it can be hard. Not getting accurate data and juggling between multiple tools to check different criteria makes the tracking process annoying.
But fortunately, you can use Google Postmaster to measure various criteria such as domain reputation, IP reputation, and spam rate in a single tool.
Let's learn what Google Postmaster is and how you can use it to improve your email performance.
Table of contents
What is the Google Postmaster tool?
A google postmaster tool is a free service that allows email senders to monitor and improve email deliverability. It provides insights into email performance and sender reputation, such as spam complaints, bounce rates, and authentication status.
Setting up the Google postmaster tool is strongly recommended if your contact list contains a sizable percentage of Gmail users to get valuable data.
Here is a peek into what you can get from the tool:
✔️ Domain reputation
✔️ IP reputation
✔️ Delivery errors
✔️ Spam rate
✔️ % of emails that passed the authentication
✔️ Encrypted traffic
Become an email marketing expert in 90 mins
On-demand certification to master email marketing
Why should you use Google Postmaster tools?
Google Postmaster Tools is a great tool to use when you send email campaigns to Gmail users. You can improve your email deliverability with the insights you get from the postmaster tools.
For example, you can see if the last email campaign had high delivery errors. With this data, you can investigate to find the root cause for the issue and use the learnings to improve future campaigns.
💡 Related guide: What is email deliverability, and why should you be aware of it?
Also, Gmail has a 27.4% market share and is the second most popular email client. If you regularly send emails to your email list, most of them probably are Gmail users. So it is beneficial to make use of the tool.
Since Google owns Gmail and Postmaster, it can take the performance data from Gmail and provide that in the Google Postmaster. So you're getting accurate data straight from one of the largest email providers in the world.
I guess these reasons are enough to get started with the Postmaster tools. Now, let us learn how you can set up and use the tool.
How to set up Google Postmaster tools?
You need a Google account to use the Google Postmaster tools. So if you don't have an account, create one now.
Let us continue with the Postmaster tool setup, assuming you have an active Google account.
Visit postmaster.google.com and log in with your Gmail account.
Click the “+” icon at the bottom right of the screen.
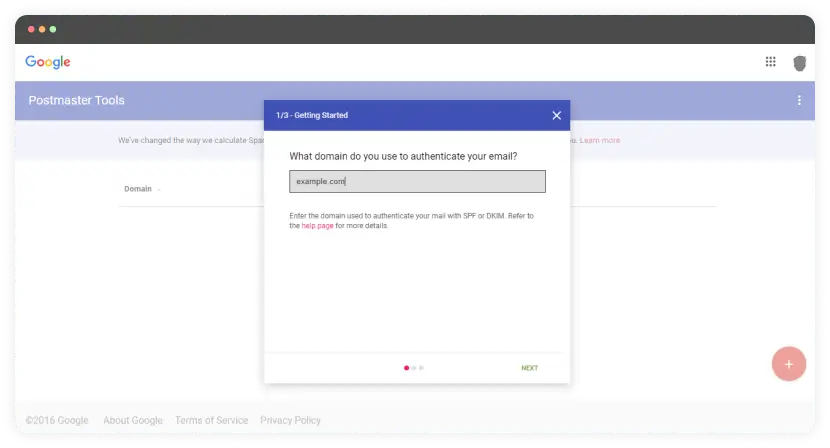
Enter your authentication domain name in the popup that appears next.
- Google Postmaster will generate a TXT record. Copy it and add it to your DNS configuration of the entered domain.
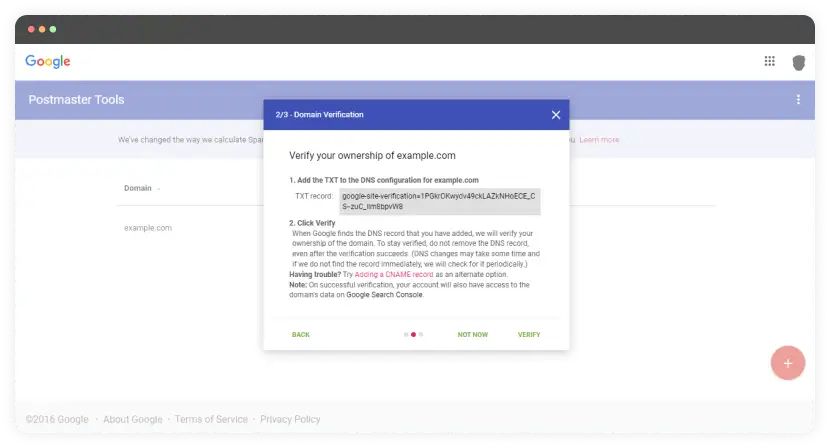
You can add a CNAME record as an alternate option if you’re having trouble with the TXT record.
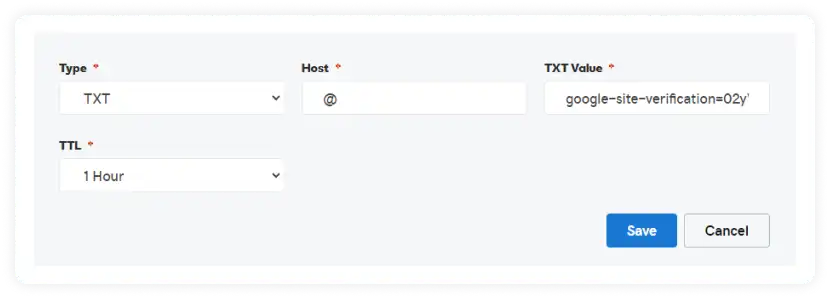
The below image shows how you can add your record to a GoDaddy domain name. It will be similar for other domain name providers as well.
- You’ve to verify the ownership after you’re done adding the record. You can do this by clicking “Verify” in the popup, which will show you a success message.
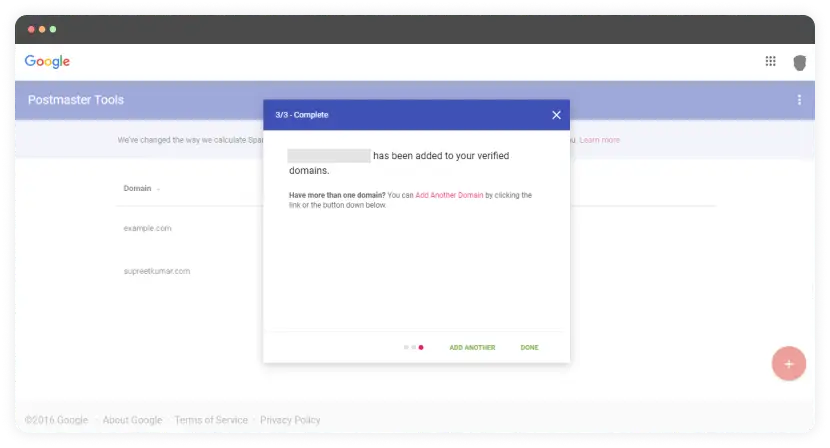
- Once you’re done adding and verifying the domain, wait for some time until Postmaster collects your associated data. Once it’s done with that, you can explore the tools it offers and measure your email campaigns.
🗒️ Note: You have set up the tool. But you might have this question - Why do I not see any data on the Postmaster tools? Here's the answer to it.
"Google only shows data for domains with significant email volume. You will notice that the data is populating the dashboard if you send 100 or more emails per day."
Get a sample AMP email in your inbox
Experience the power of interactivity right now
How to use the Google Postmaster tools?
Use the Google Postmaster tool to gather valuable insights like the ones mentioned below.
1. Domain reputation
Google determines your domain reputation score based on your history of spam complaints. Your domain reputation influences whether or not an email is delivered to the inbox by the email client.
Google Postmaster will rate your domain reputation as bad, low, medium, or high.
Bad - The domain has a history of spam complaints, and the email from this domain will end up in the spam folder.
Low - The domain has notable spam complaints, and emails from this domain will likely end up in the spam folder.
Medium - The domain sends spam emails occasionally, and the emails from this domain will most probably reach the inbox unless there is a sudden spike in the spam levels.
High - The domain sends high-quality emails following email etiquette and has a low spam rate. Emails from this domain will land in the inbox.
2. IP reputation
Your emails are sent from a device with a particular IP attached. The inbox providers will assign a negative reputation if many spam emails are sent from that IP.
On the other hand, if it is a dedicated IP address and well-maintained, it will earn a good reputation from inbox providers.
Again, the Google Postmaster will rate your IP's reputation as bad, low, medium, or high. If it is on the lower end of the spectrum, improve it. If it is on the higher end, maintain it.
💡 Related guide: How IP reputation might affect your email deliverability?
3. Spam rate
Spam rate helps you identify the percentage of users marking you spam. These people may not have found your content helpful. So if this number is significantly high, you'll have to make some tweaks to your email campaigns. Here are some suggestions:
Find the right email cadence and follow it.
Form a sunset policy and identify disengaged users.
Create a suppression list and cut your ties with these users.
You'll see a positive impact on your spam rates if you follow these steps.
4. Delivery errors
Not every message reaches your user's inbox for many reasons. The delivery error dashboard shows you the percentage of emails that didn't make it to the users' inboxes and got rejected – temporarily or permanently.
Here are the error codes you will see in the Postmaster tool:
Rate limit exceeded: Gmail will put a temporary limit when your IP sends too much traffic at higher rates.
Suspected spam: Gmail flagged the traffic from your IP as spam.
Email content is possibly spammy: Gmail systems detected the traffic as spam due to the email content.
Bad or unsupported attachment: Unsupported or bad email attachments are detected by Gmail.
DMARC policy of the sender domain: The sender domain has set up its DMARC rejection policy.
Sending IP has a low reputation: The sender IP has a poor reputation.
Sending domain has a low reputation: The sender domain has a poor reputation.
IP is in one or more public RBLs: The sender IP is listed in one or more public Real-time Blackhole Lists.
Domain is in one or more public RBLs: The sender domain is listed in one or more public Real-time Blackhole Lists.
Bad or missing PTR record: The sender IP has no PTR record associated with it.
Follow these steps to lower the delivery rate as much as possible:
👉 Set up your DMARC, DKIM, and SPF record.
👉 Don't add a malicious attachment to your emails.
5. Authenticated traffic
In this dashboard, you'll see how many emails have passed the DMARC, DKIM, and SPF records versus the total number of emails that attempted to pass. This dashboard has three graphs meant to show the data of these three records.
SPF graph: This graph shows the percentage of emails that passed SPF vs. all emails from that domain that attempted SPF, excluding spoofed emails.
DKIM graph: This graph shows the percentage of emails that passed DKIM vs. all emails from that domain that attempted DKIM.
DMARC graph: This graph shows the percentage of emails that passed DMARC vs. all emails received from the domain that passed SPF or DKIM.
6. Encryption
Emails must be encrypted to keep your data safe from third-party intruders. And for that reason, this graph shows you the number of encrypted incoming and outgoing emails.
The Transport Layer Security (TLS) mechanism is used to check the encryption of emails.
The encryption graph should always be at 100%; if it isn't, it can become a serious security and deliverability threat, and you need to get it sorted quickly.
That's it. Congratulations on making it this far!
What you should do next
Hey there, thanks for reading till the end. Here are 3 ways we can help you grow your business:
Talk to an email expert. Need someone to take your email marketing to the next level? Mailmodo’s experts are here for you. Schedule a 30-minute email consultation. Don’t worry, it’s on the house. Book a meet here.
Send emails that bring higher conversions. Mailmodo is an ESP that helps you to create and send app-like interactive emails with forms, carts, calendars, games, and other widgets for higher conversions. Get started for free.
Get smarter with our email resources. Explore all our knowledge base here and learn about email marketing, marketing strategies, best practices, growth hacks, case studies, templates, and more. Access guides here.


